
In this article, we will see How to capture screenshot of failed test cases, How we can attach screenshot in testNG report and how to capture multi-screenshot in Selenium.
Table of Contents
How to Take Screenshot for Failed Test Cases in Selenium:
If the scripts failed, it is very difficult to find screen means on which screen or web page test case failed.
But by using capture screenshot of failed test cases, we can easily see the screen. For this we will use ITestListener Interface.
Taking screenshot of all test cases create the memory issue because always we run the all test cases for regression purpose so it will store screenshot again and again.
So better is to take failed test case screenshot.
ITestListener Interface :– This is the interface which we need to implement into our class. It has a method ‘onTestFailure’. We will add the code in this method to take the screenshot.
Instead of just taking the screenshot, we will get the test method name and screenshot and store it into destination folder.
Follow below steps to take screenshot:
- Create a class to write our testscript.
- Implement ITestListener into above created class.
- Write code of capture screenshot in OnTestfailure method.
Step 1: Create a class ‘ListenerTest’ and implements ‘ITestListener’. MouseOver on error red line of the class name and click on Add unimplemented methods.
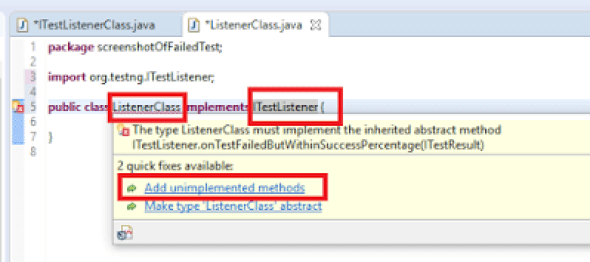
By clicking on “Add unimplemented methods” , multiple unimplemented methods (without a body) is added to the code.
package Listener_Demo;

import org.testng.ITestContext;
import org.testng.ITestListener;
import org.testng.ITestResult;

public class ListenerTest implements ITestListener{

      @Override
      public void onTestStart(ITestResult result) {
            // TODO Auto-generated method stub

      }

      @Override
      public void onTestSuccess(ITestResult result) {
            // TODO Auto-generated method stub

      }

      @Override
      public void onTestFailure(ITestResult result) {
            // TODO Auto-generated method stub

      }

      @Override
      public void onTestSkipped(ITestResult result) {
            // TODO Auto-generated method stub

      }

      @Override
      public void onTestFailedButWithinSuccessPercentage(ITestResult result) {
            // TODO Auto-generated method stub

      }

      @Override
      public void onStart(ITestContext context) {
            // TODO Auto-generated method stub

      }

      @Override
      public void onFinish(ITestContext context) {
            // TODO Auto-generated method stub

      }


}
In the above code, ITestResult is an interface which keeps all information about test case like test case name, test case execution status.
Now let’s modify the ‘ListenerTest’ class.
Here we want to capture screenshot of only failed test cases so we need to write code for capture screenshot in OnTestFailure method.
Code for Take Screenshot: –
By using TakesScreenshot and getScreenshotAs method we can take screenshot.
- TakesScreenshot t = (TakesScreenshot)driver; (can’t create object directly so typecast and then create ).
- File srcFile = t.getScreenShotAs(OutPutType.FILE); (use the object created, then get screenshot as file & assign it to the File variable).
- FileUtils.copyFile(srcFile, new File(“./ScreenShots/image1.png”);
Step 2: – Create another class to write actual test script where test case will get failed.
package Listener_Demo;

import java.util.concurrent.TimeUnit;

import org.openqa.selenium.By;
import org.openqa.selenium.WebDriver;
import org.openqa.selenium.chrome.ChromeDriver;
import org.testng.Assert;
import org.testng.annotations.BeforeTest;
import org.testng.annotations.Test;

public class DemoListener {

      WebDriver driver;

      @BeforeTest
      public void openBrowser(){

      System.setProperty("webdriver.chrome.driver", "F:\\Selenium jars\\chromedriver_win32\\chromedriver.exe");
      driver=new ChromeDriver();
      driver.manage().timeouts().implicitlyWait(30,TimeUnit.SECONDS);


      }

      @Test
      public void OpenSite(){

            driver.get("https://automationtestingmaterial.blogspot.in/");

      }

      @Test
      public void clickOnAdvanceJavaLink(){

            driver.findElement(By.linkText("Advance Java")).click();

      }

      @Test
      public void testToFail(){

            System.out.println("This method is test to fail");
            String pageSource= driver.getPageSource();
            Assert.assertEquals(pageSource,pageSource.contains("abcd")); // Forcefully we will fail

      }

}
Step 3: – Now implement Listener class which we were earlier created with name ‘ListenerTest’ in the class name ‘DemoListener’.
By using @Listeners annotation we can implements it.
Final code is:
package Listener_Demo;

import java.util.concurrent.TimeUnit;

import org.openqa.selenium.By;
import org.openqa.selenium.WebDriver;
import org.openqa.selenium.chrome.ChromeDriver;
import org.testng.Assert;
import org.testng.annotations.BeforeTest;
import org.testng.annotations.Listeners;
import org.testng.annotations.Test;

@Listeners(Listener_Demo.ListenerTest.class)
public class DemoListener {

      WebDriver driver;

      @BeforeTest
      public void openBrowser() {

            System.setProperty("webdriver.chrome.driver", "F:\\Selenium jars\\chromedriver_win32\\chromedriver.exe");
            driver = new ChromeDriver();
            driver.manage().timeouts().implicitlyWait(30, TimeUnit.SECONDS);

      }

      @Test
      public void OpenSite() {

            driver.get("https://automationtestingmaterial.blogspot.in/");

      }

      @Test
      public void clickOnAdvanceJavaLink() {

            driver.findElement(By.linkText("Advance Java")).click();

      }

      @Test
      public void testToFail() {

            //System.out.println("This method is test to fail");
            String pageSource = driver.getPageSource();
            Assert.assertEquals(pageSource, pageSource.contains("abcd")); // Forcefully we will fail this
      }

}
Step 4: – After Modification Code is like below.
package Listener_Demo;
import org.testng.ITestContext;
import org.testng.ITestListener;
import org.testng.ITestResult;

public class ListenerTest implements ITestListener{

      @Override
      public void onTestStart(ITestResult re) {


      }

      @Override
      public void onTestSuccess(ITestResult re) {


      }

      @Override
      public void onTestFailure(ITestResult re) {

     //in below code, " DemoListener .driver" is used to get same driver from sample test class.

     TakesScreenshot  t = (TakesScreenshot) DemoListener.driver;

     File srcFile = t.getScreenshotAs(OutputType.FILE);

     try {
     FileUtils.copyFile(srcFile, new File("./ScreenShot/"+arg0.getName()+".jpg"));
  }
     catch (IOException e) {
     e.printStackTrace();
  }

                  }
}

      }
How can we attach a failure screenshot to the testNG Report: –
Above code will also work but we need to add one more thing. We will use Reporter.log to add screenshot link into testNG report. Then we can find the screenshot link under the failed test cases details.
In the above code where I have written code of screenshot, I will add one more line.
See modified code:
package Listener_Demo;
import org.testng.ITestContext;
import org.testng.ITestListener;
import org.testng.ITestResult;

public class ListenerTest implements ITestListener{

      @Override
      public void onTestStart(ITestResult re) {


      }

      @Override
      public void onTestSuccess(ITestResult re) {


      }

      @Override
      public void onTestFailure(ITestResult re) {

     //in below code, " DemoListener .driver" is used to get same driver from sample test class.

     TakesScreenshot  t = (TakesScreenshot) DemoListener.driver;

     File srcFile = t.getScreenshotAs(OutputType.FILE);

     try {
     File destFile = new File ("./ScreenShot/"+arg0.getName()+".jpg");
     FileUtils.copyFile(srcFile, destFile);
     Reporter.log("<a href='"+ destFile.getAbsolutePath() + "'> <img src='"+ destFile.getAbsolutePath() + "' height='100' width='100'/> </a>");

    }
    catch (IOException e) {
    e.printStackTrace();
   }

                  }
}

      }
How to take multiple screenshot in Selenium WebDriver using java:
We will see how we will setup a utility to take multiple screenshot using Selenium WebDriver.
We will take a simple example of Google page to capture the multiple screenshot.
Please follow below steps to capture the multiple screenshot.
Download MultiScreenShot JAR file – Download
Import the jar file into your Selenium Project.
[How to import jar files into Selenium Project]
Import below package into your class file.
import multiScreenshot.MultiScreenshot;
To use MultiScreenshot, we need to create object of it. Take two arguments in this.
First is the path to save screenshot and second is the class name. Here class name is use to create the folder and save the screenshot inside it.
MultiScreenshot m = new MultiScreenshot(“D:\\screenshot”, “GoogleFolder”);
Now add also below code to capture screenshot.
m.multiScreenShot(driver);
Full Code:
@Test
public void Google() throws Exception {
  driver.get(baseUrl);
  driver.findElement(By.linkText(Prop.getProperty("AboutLinkText"))).click();
  MultiScreenShot m = new MultiScreenShot((“D:\\screenshot”, “GoogleFolder”);
  m.multiScreenShot(driver);
  driver.findElement(By.linkText("More about our philosophy")).click();
  m.multiScreenShot(driver);
}
On running method, multiScreenshot captures multiple screenshot and stores into given folder.
Note:
Apart from taking screenshot, by using this we can take screenshot of individual element.
m.elementScreenshot(driver, driver.findElement()By.id(“Element_ID”)));
Summary:
In this post, we have covered ‘How To Take Screenshot for Failed Test Cases in Selenium’.
We have also learnt How we can attach screenshot in testNG report and how to capture multi-screenshot in Selenium.
I am sure this content added some additional value in your skills and also helpful to start selenium from scratch.
Final word, Bookmark this post ‘How To Take Screenshot for Failed Test Cases in Selenium’ for future reference.
If you have other questions or feedback, the comment section is yours. Don’t forget to leave a comment below!